The Revenge of the Matzoh Egg
Ok, it’s not a revenge, but I thought I would make a short post about breakfast. A matzoh egg with some spinach sauteed in olive oil and green garlic. I even have a picture:

Entropic Words from Neilathotep
Ok, it’s not a revenge, but I thought I would make a short post about breakfast. A matzoh egg with some spinach sauteed in olive oil and green garlic. I even have a picture:
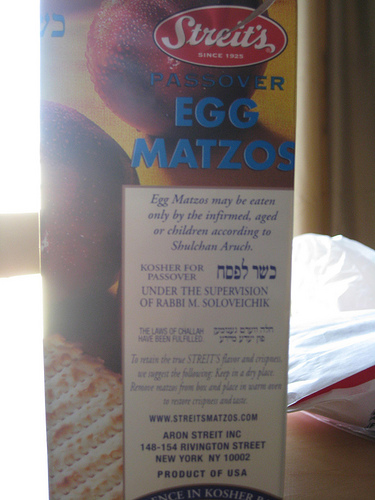
Matzoh Egg, or Matzoh Brie, should not be confused with Egg Matzoh, which should only be eaten by the infirmed, aged or childen:
Anyway, this is a typical Eastern European food during Passover, and also something that I like quite a bit, and I try to make at least once a year. It’s really simple actually, as you will see, but it also opens itself up for various additions (which I plan to play with in the next week or so).
Here is my basic recipe:
Matzoh Egg
Serves 1 to 2
2 eggs
1 sheet matzoh
1 Tbsp butter
Note that you can scale this up by adding an additional sheet of mazoh per two eggs, but after about 6 eggs and 3 sheets you’d need a really large pan to cook it effectively. You can also finish it in the oven like a frittata to set the top.
Now for variations, you can incorporate small amounts of ingredients as you would an omelet, right before you finish setting the eggs (this means you will likely want to precook them).
You’ve been warned by the title. If you don’t want to read about food, move along!
Saturday Mackenzie and I made the Zuni Cafe Roast Chicken recipe, which I found, slightly adapted, at the rather awesome food blog smitten kitchen.
We actually made a couple of modifications to the recipe. 1) I used a kosher chicken, so I didn’t salt it ahead of time, but I did put pepper and herbs on it as instructed and 2) instead of using garlic cloves in the bread salad, we used green garlic, because it’s in season and delightful.
Here is a picture of the chicken after it was flipped over the second time for a few more minutes to crisp up the breast skin:

And here it is all done, after slashing the skin (i guess to let steam out) and letting it rest before carving:

And finally, the chicken, and the bread salad on the table. I really should look into getting some sort of serving platter one of these days.

The recipe as presented on the blog is actually fairly straightforward – the big to do is preparing ahead of time – but I reckon you could just dry a kosher chicken really well, and put some pepper on it and some herbs in it and cook it at the last moment in this way, assuming it was small enough. Also dripping a bit of the pan juices over the bread salad at the last moment makes from some extra deliciousness.
And now, for a bonus, absinthe shown before and after mixing with water:


I saw a similar recipe to this online, but I lost the link, so I can’t reference it. This is simple, suitable for a rushed weeknight for sure!
Chipotle Bean Tostadas (serves 1-3)
1 16oz can refried beans (or homemade, about 2 cups – but this is weeknight dinner, who has times to do this)
1/2 teaspoon ground chipotle pepper (or too taste)
1/3 cup vegetable oil
corn tortillas
Toppings:
cotija cheese (shredded)
tomato (diced)
onion (diced)
cilantro (sliced)
lettuce (shredded)
sour cream or crema
For the beans:
Heat per the can, stiring in the chipotle. Feel free to add more or less to achieve desired level of heat.
For the tostada “shells” – heat the oil in a skillet. When it is truly hot (the tortilla should foam instantly when an edge is place in), slide a tortilla in the pan. Hold down with tongs and cook for about 30 seconds per side, until it is brown and crispy. Move to paper towel to dry off excess oil.
Spoon some of the beans on the shell. Top as desired, enjoy.
Another week, another loaf of bread. Well, sort of. After my abject failure last week, I decided to make regular, kneaded bread today. Every recipe I had and most I found on the internet were for two loaves of bread, which is more than I wanted! However I found this recipe which looked reasonable enough.
The Kitchen-Aid mixer made the kneading easy (I actually cut it back to 8 minutes instead of the mentioned 10). Here is a picture of the dough after the second rise:

And here is the finished loaf:
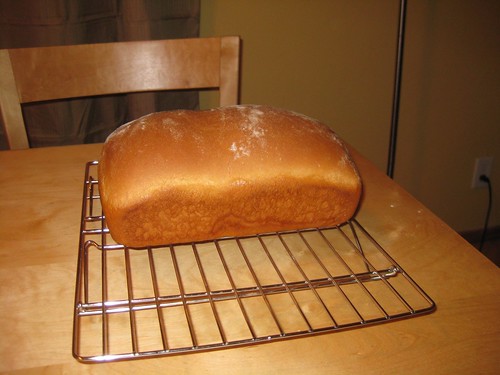
It’s fairly tasty, although I think it could do without the honey perhaps. It would make for some delicious french toast, however! Here is the recipe as I made it:
3 cups unbleached all-purpose flour
1 cup very warm milk
2 tablespoons melter butter
2 tablespoon honey
2 1/4 teaspoons (1 packet) instant yeast
1/2 teaspoon salt
Mix in the standmixer for 8 minutes. Let rise covered for an hour, shape, place in a greased pan, cover, allow another hour to rise. Bake at 350F for 45 minutes or until the internal temperature is 190F. Turn out on to a rack and allow to cool for about 1 hour before cutting.
This stuff was all the rage around two years ago, when the recipe was first published in the New York Times . I thought about trying it then, but I never got around to it. Then I mostly forgot about it until yesterday, when I decided to give it a go.
I wasn’t really sure on the kind of yeast to use, so I got both Rapid Rise and regular active dry yeast. I made a batch of the dough with each, and to be honest, they look about the same across time (I wish I had two bowls of the same size, it would have been easier.
Active Dry, 12 hours:

Rapid Rise, 12 hours:

Active Dry, 18 hours:
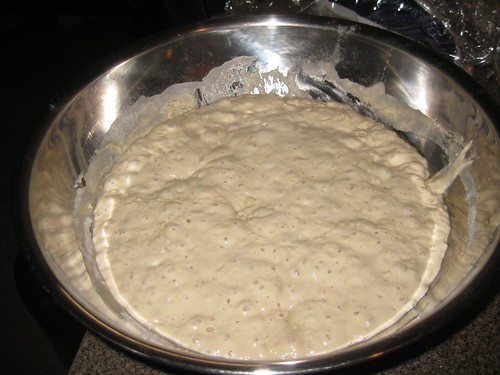
Rapid Rise, 18 hours:
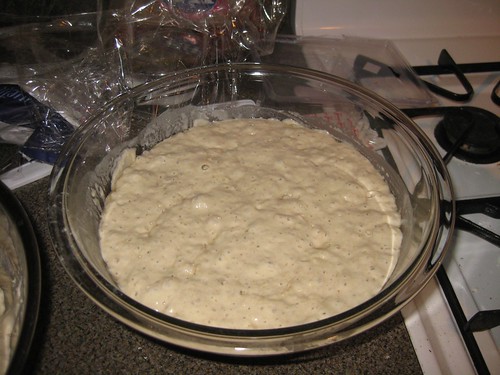
I was only able to bake one, and I was going to do the rapid rise batch, except it fell apart and stuck too much to the towel, so instead I bake the other one. The loaf that came out looks kind of nice:

The only thing is, it doesn’t taste very good. I mean, it doesn’t taste bad at all, but it is not good, and definitely I could have made tastier bread, with a little bit of kneading, in less than the 21 hours or so it took from start to finish. I don’t think I’ll be trying this out again.
There are probably a million recipes for butternut squash soup around. The following is a fairly simple one, utilizing ingredients that I had on hand. You can probably use it as a spring board to create your own variant with very little effort. It is something lovely to make during the colder months of the year, even in places that don’t get that cold, like San Francisco.
Simple Butternut Squash Soup
serves 4-6
1 small butternut squash (about 1 lb), peeled and cut into 1/2 inch cubes
1 medium carrot, finely diced
1 medium leek (or half a small onion to be more traditional), finely diced
1 stick celery, finely diced
1 tbsp freshly ground ginger (you could also use grated fresh ginger root)
5 cups vegetable broth, or chicken broth, or water, or white wine or a combination (I used 4 cups of vegetable brother and 1 cup of white wine)
salt, pepper to taste
1. Put the oil in a large sauce pan or dutch oven and heat over medium until shimmering. Add the carrot, leeks, and celery along with about 1 tsp of salt. Cook, stirring occasionally, for about 5 minutes until the aromatics are translucent and are softening.
2. Add the squash, liquid and ginger. Bring to a simmer, then cover and reduce heat to low. Cook for approximately 45 minutes until the squash is tender
3. Use an immersion blender to puree the soup. You could use a potato masher or a standard blender as well, if that is what you have on hand. Finish it up with a whick to make sure it is smooth, then add salt and pepper to taste.
Some variations on a similar theme:
Wohali’s sweet potato butternut squash soup
Quinn’s Pumpkin Bisque
So, I cannot claim that things are settled yet, but yesterday night I powered through unpacking the kitchen so I can cook again. So I have cooked the past two nights – more info on this will follow later in this post. But first, I must discuss my new favorite thing – using the xbox 360 to view downloaded vidoes over the network. Quite simply it is able to access video files stored on a windows PC (or another computer that runs the windows media player sharing protocol) and then show them on your TV. This is cool because I have a lot of British TV shows in .avi format. Historically I watched these mostly on my macbook pro, usually lying on my bed. Occasionally I would hook the laptop up to the TV via HDMI and watch specific things, like Doctor Who episodes, like that – but it’s sort of a pain. This is quite seamless, and simple, and great. The 360 is the best console I’ve ever owned.
Ok, on to food. Last night I made carnival squash with chili-maple oil:
1 small squash (acorn, carnival, small butternut)
2 tbsp butter
2 tbsp maple syrup
1 small dried chili
1) Preheat oven to 350 degrees
2) Cut the squash in half (crosswise for roundish squash, lengthwise for butternut). Scoop out the seeds. Spray the cut side with cooking spray. Bake face down on baking sheet for 45 minutes, or until flesh is soft when poked with skewer
3) While the squash is baking, seed the chili and cut in to thin strips. Melt the butter and mix with the syrup and chili strips.
4) When the squash is done, allow to cool slightly, then either brush the halves with the butter and serve whole, or scoop out the flesh and mix with the butter.
Tonight I made some garlic cooked shrimp with “BBrazilian style” collard greens. The shrimp were just cooked in olive oil, garlic, salt, pepper and a little bit of wine until done – simple. The recipe for the greens, which I got from wohali (I halved it):
1 1/4 pound collard greens, stems and center ribs discarded and
leaves halved lengthwise
3 garlic cloves
1 tablespoon olive oil
1) Stack half of collard leaves and roll into a cigar shape. Cut crosswise into very thin strips (1/16 inch wide). Repeat with remainder.
2) Mince and mash garlic to a paste with 3/4 teaspoon salt. Heat oil in a
12-inch heavy skillet over medium heat until it shimmers, then cook garlic, stir
ring, 30 seconds. Add collards with 1/4 teaspoon pepper and cook, tossing, until
just tender and bright green, 3 to 4 minutes.
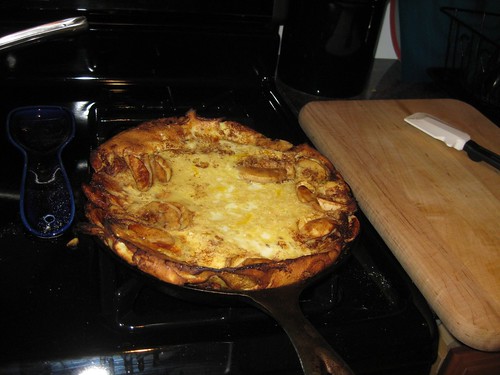
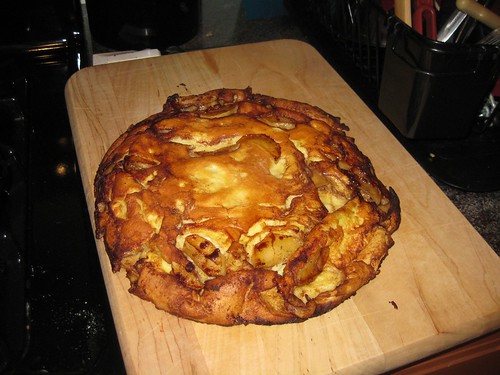
I am a copycat. I made an Dutch applep ancake for dinner, spurred on by Joan, as well as my friend mike talking about one on irc. Here is a picture of the pancake soon after it came out of the oven (it was even more puffed when it was still in the oven!):
And flipped over:
Anyway, I modified Joan’s recipe, which she further modified from Mr Breakfast.
Pre-heat oven to 375°F. In a medium bowl, mix together the milk, eggs, flour and granulated sugar until batter is of consistent thickness (no lumps). Stir in the Cognac.
In a ovenproof skillet, melt butter over medium-high heat. Add apples, cinnamon and brown sugar. Reduce heat to medium and cook, stirring occasionally for 2-3 minutes, or until the apples are softened slightly. Remove pan from heat. Pour batter over the apples in pan. Place the pan in the oven and bake for 30-35 minutes, until the pancake is lightly browned and puffy.
Dust with powdered sugar and serve with lemon wedges, if desired.
And by pickles, I mean kosher dills. I “put up” two quart of them tonight, filled mostly with produce that I bought at the Alemany Farmer’s Market yesterday. Well. the cucumbers, garlic and dill at least. The salt and “pickling spice” were store bought. While it is true one can just buy dill pickles at the store, I find them uninspired. They do not take my back to my childhood when my Grandma would make her own pickles from cucumbers grown in her garden. Therefore I’ve taken to making my own – where taking to is one abortive attempt and one successful attempt last year, and one attempt starting tonight this year.
A few things to keep in mind when making these pickles:
Dill Pickles:
A quart jar can hold approximately 1 pound of cucumbers.
1. Into the bottom of each quart jar place:
1 heaping tablespoon kosher salt or coarse sea salt
1 heaping teaspoon pickling spices
2 peeled cloves of garlic
3 sprigs of fresh dill
2. Fill the jars small cucumbers, stems cut off, sliced in half or quarters if they are very stout. Pack them in fairly tight but leave some room on the top
3. Place 3 more sprigs of fresh dill on top of the vegetables to prevent them from floating.
4. Fill the jars with cold water right to the brims, put on the screw caps and invert the jars enough to dissolve the salt. Slightly loosen the caps to allow the escape of the fermentation gases and the brine to leak out. Put the jars in a cool dark place, with plenty of newspaper underneath to soak up any overflowing brine.
5. Check the pickles every few days, and if you see any scum on top, scoop it off and replace the new brine (1 tablespoon of salt to 12 ounces of water).
6. Leave the pickles for about 2 weeks. Check them for the degree of doneness. At this point they would be considered “half-sour†or “youngâ€, and are ready to eat. If you prefer a more intense flavor, you can let them ferment longer, up to a year. Top off the jars with more brine (1 tablespoon of salt to 12 ounces of water) Wipe off the rims and recap the jars tightly. Can or refrigerate the pickles to stop the fermentation process.
Powered by WordPress